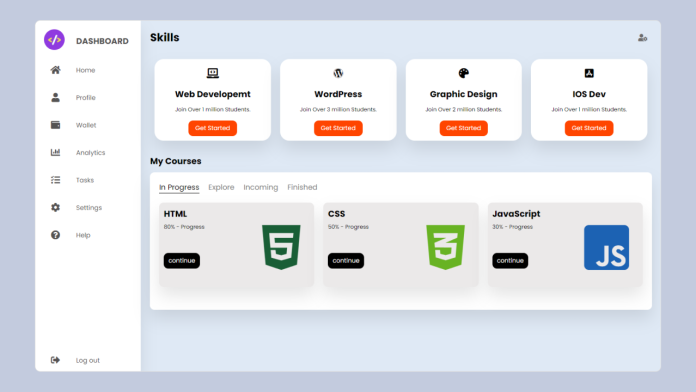
Admin dashboards are essential for handling and tracking website or application activities. In this lesson, we will look at how to use HTML and CSS to create a professional and responsive admin panel. This step-by-step tutorial will help you construct a magnificent admin panel that suits your exact requirements, whether you’re a newbie or an experienced developer.
Understanding the Structure of the Code
Creating a Navigation Menu
Implementing “My Courses” into Action
Creating a Responsive Dashboard
Using JavaScript to Improve the Dashboard
Designing Administrator Dashboard Themes
Source code
If you like this admin dashboard design, then feel free to use it. Copy the code by clicking on Copy button provided below. First, you have to create two files. One of them is HTML, and the other is CSS after creating these files, paste the code provided below.
HTML CODE:
<!DOCTYPE html>
<html lang="en">
<head>
  <meta charset="UTF-8" />
  <title>Dashboard | By Code Info</title>
  <link rel="stylesheet" href="style.css" />
  <!-- Font Awesome Cdn Link -->
  <link rel="stylesheet" href="https://cdnjs.cloudflare.com/ajax/libs/font-awesome/5.15.4/css/all.min.css"/>
</head>
<body>
  <div class="container">
    <nav>
      <ul>
        <li><a href="#" class="logo">
          <img src="/logo.jpg" alt="">
          <span class="nav-item">DashBoard</span>
        </a></li>
        <li><a href="#">
          <i class="fas fa-home"></i>
          <span class="nav-item">Home</span>
        </a></li>
        <li><a href="">
          <i class="fas fa-user"></i>
          <span class="nav-item">Profile</span>
        </a></li>
        <li><a href="">
          <i class="fas fa-wallet"></i>
          <span class="nav-item">Wallet</span>
        </a></li>
        <li><a href="">
          <i class="fas fa-chart-bar"></i>
          <span class="nav-item">Analytics</span>
        </a></li>
        <li><a href="">
          <i class="fas fa-tasks"></i>
          <span class="nav-item">Tasks</span>
        </a></li>
        <li><a href="">
          <i class="fas fa-cog"></i>
          <span class="nav-item">Settings</span>
        </a></li>
        <li><a href="">
          <i class="fas fa-question-circle"></i>
          <span class="nav-item">Help</span>
        </a></li>
        <li><a href="" class="logout">
          <i class="fas fa-sign-out-alt"></i>
          <span class="nav-item">Log out</span>
        </a></li>
      </ul>
    </nav>

    <section class="main">
      <div class="main-top">
        <h1>Skills</h1>
        <i class="fas fa-user-cog"></i>
      </div>
      <div class="main-skills">
        <div class="card">
          <i class="fas fa-laptop-code"></i>
          <h3>Web developemt</h3>
          <p>Join Over 1 million Students.</p>
          <button>Get Started</button>
        </div>
        <div class="card">
          <i class="fab fa-wordpress"></i>
          <h3>WordPress</h3>
          <p>Join Over 3 million Students.</p>
          <button>Get Started</button>
        </div>
        <div class="card">
          <i class="fas fa-palette"></i>
          <h3>graphic design</h3>
          <p>Join Over 2 million Students.</p>
          <button>Get Started</button>
        </div>
        <div class="card">
          <i class="fab fa-app-store-ios"></i>
          <h3>IOS dev</h3>
          <p>Join Over 1 million Students.</p>
          <button>Get Started</button>
        </div>
      </div>

      <section class="main-course">
        <h1>My courses</h1>
        <div class="course-box">
          <ul>
            <li class="active">In progress</li>
            <li>explore</li>
            <li>incoming</li>
            <li>finished</li>
          </ul>
          <div class="course">
            <div class="box">
              <h3>HTML</h3>
              <p>80% - progress</p>
              <button>continue</button>
              <i class="fab fa-html5 html"></i>
            </div>
            <div class="box">
              <h3>CSS</h3>
              <p>50% - progress</p>
              <button>continue</button>
              <i class="fab fa-css3-alt css"></i>
            </div>
            <div class="box">
              <h3>JavaScript</h3>
              <p>30% - progress</p>
              <button>continue</button>
              <i class="fab fa-js-square js"></i>
            </div>
          </div>
        </div>
      </section>
    </section>
  </div>
</body>
</html>
Second, create a CSS file with the name of style.css and paste the given codes in your CSS file. Remember, you have to create a file with .css extension.
CSS CODE:
/*  import google fonts */
@import url("https://fonts.googleapis.com/css2?family=Poppins:wght@400;500;600;700");
*{
  margin: 0;
  padding: 0;
  outline: none;
  border: none;
  text-decoration: none;
  box-sizing: border-box;
  font-family: "Poppins", sans-serif;
}
body{
  background: #dfe9f5;
}
.container{
  display: flex;
}
nav{
  position: relative;
  top: 0;
  bottom: 0;
  height: 100vh;
  left: 0;
  background: #fff;
  width: 280px;
  overflow: hidden;
  box-shadow: 0 20px 35px rgba(0, 0, 0, 0.1);
}
.logo{
  text-align: center;
  display: flex;
  margin: 10px 0 0 10px;
}
.logo img{
  width: 45px;
  height: 45px;
  border-radius: 50%;
}
.logo span{
  font-weight: bold;
  padding-left: 15px;
  font-size: 18px;
  text-transform: uppercase;
}
a{
  position: relative;
  color: rgb(85, 83, 83);
  font-size: 14px;
  display: table;
  width: 280px;
  padding: 10px;
}
nav .fas{
  position: relative;
  width: 70px;
  height: 40px;
  top: 14px;
  font-size: 20px;
  text-align: center;
}
.nav-item{
  position: relative;
  top: 12px;
  margin-left: 10px;
}
a:hover{
  background: #eee;
}
.logout{
  position: absolute;
  bottom: 0;
}

/* Main Section */
.main{
  position: relative;
  padding: 20px;
  width: 100%;
}
.main-top{
  display: flex;
  width: 100%;
}
.main-top i{
  position: absolute;
  right: 0;
  margin: 10px 30px;
  color: rgb(110, 109, 109);
  cursor: pointer;
}
.main-skills{
  display: flex;
  margin-top: 20px;
}
.main-skills .card{
  width: 25%;
  margin: 10px;
  background: #fff;
  text-align: center;
  border-radius: 20px;
  padding: 10px;
  box-shadow: 0 20px 35px rgba(0, 0, 0, 0.1);
}
.main-skills .card h3{
  margin: 10px;
  text-transform: capitalize;
}
.main-skills .card p{
  font-size: 12px;
}
.main-skills .card button{
  background: orangered;
  color: #fff;
  padding: 7px 15px;
  border-radius: 10px;
  margin-top: 15px;
  cursor: pointer;
}
.main-skills .card button:hover{
  background: rgba(223, 70, 15, 0.856);
}
.main-skills .card i{
  font-size: 22px;
  padding: 10px;
}

/* Courses */
.main-course{
  margin-top:20px ;
  text-transform: capitalize;
}
.course-box{
  width: 100%;
  height: 300px;
  padding: 10px 10px 30px 10px;
  margin-top: 10px;
  background: #fff;
  border-radius: 10px;
  box-shadow: 0 20px 35px rgba(0, 0, 0, 0.1);
}
.course-box ul{
  list-style: none;
  display: flex;
}
.course-box ul li{
  margin: 10px;
  color: gray;
  cursor: pointer;
}
.course-box ul .active{
  color: #000;
  border-bottom: 1px solid #000;
}
.course-box .course{
  display: flex;
}
.box{
  width: 33%;
  padding: 10px;
  margin: 10px;
  border-radius: 10px;
  background: rgb(235, 233, 233);
  box-shadow: 0 20px 35px rgba(0, 0, 0, 0.1);
}
.box p{
  font-size: 12px;
  margin-top: 5px;
}
.box button{
  background: #000;
  color: #fff;
  padding: 7px 10px;
  border-radius: 10px;
  margin-top: 3rem;
  cursor: pointer;
}
.box button:hover{
  background: rgba(0, 0, 0, 0.842);
}
.box i{
  font-size: 7rem;
  float: right;
  margin: -20px 20px 20px 0;
}
.html{
  color: rgb(25, 94, 54);
}
.css{
  color: rgb(104, 179, 35);
}
.js{
  color: rgb(28, 98, 179);
}

